Introduction
For our project, we are going to be combining Medieval Japan with a post-apocalyptic setting. Our first step for this project is to start thinking of a backstory. To do this, we write down key words and find example images of Medieval Japan or a post-apocalyptic environment that we think would suit our environment. We are also beginning to come up with concepts for creatures, people, architecture etc.
Research Poster
Here is a landscape A3 poster with visual image references and inspiration for my concept art and my part of the asset pack project. I used Photoshop to create this poster and add annotations to explain my reasoning.

Backstory
Some images for inspiration:


Thousands of years in the future, the oceans on Earth dried out. This unleashed mass dehydration and malnutrition upon every living thing. In a desperate attempt to restore life, a corporation infamously known amongst survivors as EcoLife, created machines to do their work for them. These machines were tasked with the job to salvage any remaining water so it can cycle through Earth once again. However, having misunderstood their orders, these killing machines discovered that humans themselves are 70% water. As a result, a mass genocide spread across Earth, forcing humans to fight for their lives with little of what’s left.
Creature Concepts
My part of the project is to work on creating creatures and designing concepts suitable for our asset pack environment. Initial ideas and inspiration:

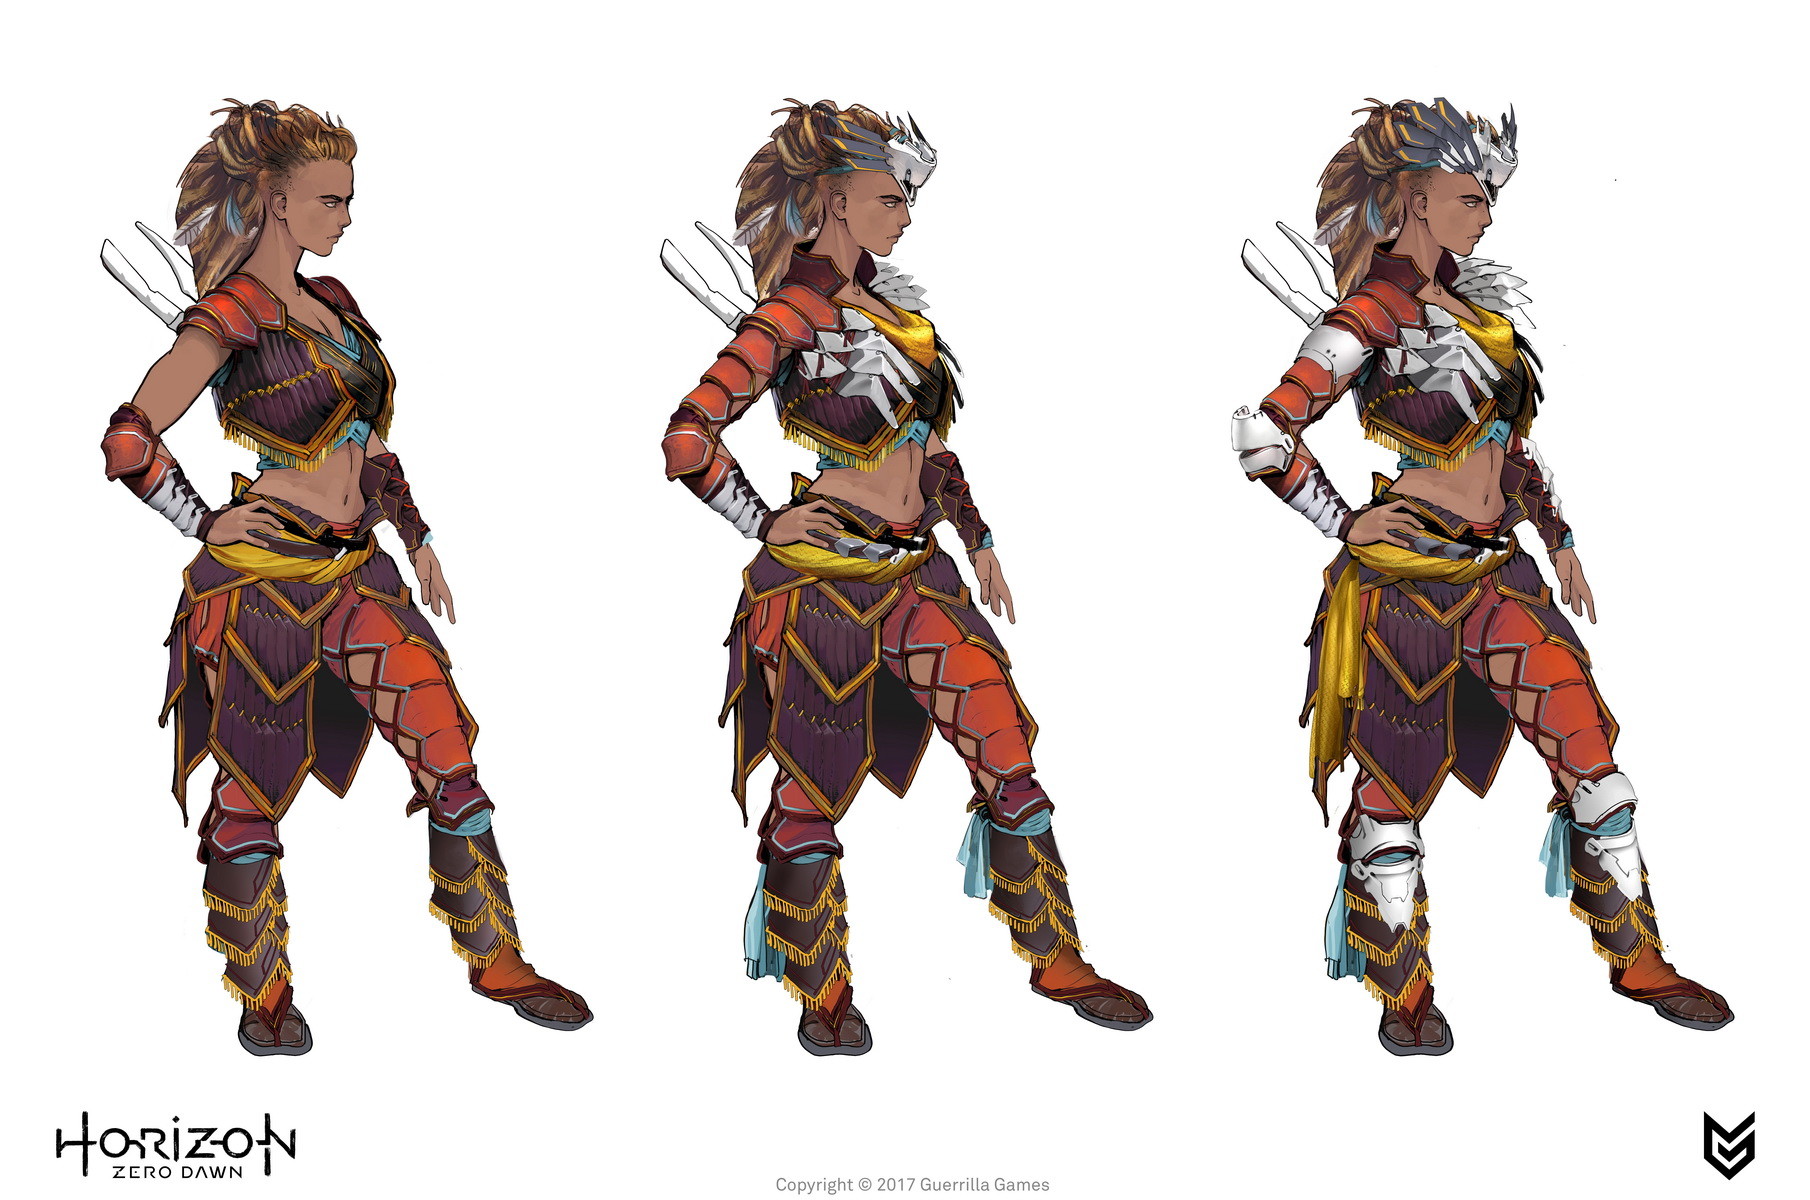
Here are a few images of desert animals, they share a few similar qualities such as scales, horns, or beige colouring. There are also some images of concept creatures created by other people, and image references from a game called Horizon Zero Dawn.
These creature concept images are inspiring me to creature a range of machine-like enemies for our asset pack environment. A few of these images are taken from a game called Horizon Zero Dawn and are being used for inspiration.
Prior to this blog, I had started a few concept sketches for closely-associated Japanese creatures/myths such as the Kitsune. However, now my idea for the creature concepts have changed. I still think it’s interesting to see how my ideas have varied though. Here are so photos of my initial artwork:


Alternatively, I have now decided to take my inspiration from the metal creations/animals in Horizon Zero Dawn and combine them with some popular dinosaurs, such as the Allosaurus. I think this will be more interesting and fun to design because dinosaurs are extinct and are seen less in video games and culture these days.
For this college project, and for entertainment, I was able to buy the Horizon Zero Dawn game and get an idea of what tribal life is like for our project. This will allow me to get closer shots of the animals so I can see how much detail is needed for a realistic outcome. Furthermore, I can get screenshots of the tribal aesthetic using the game’s photo mode. Here are a few images I have taken during the first few hours of the game:


A further look on one of the more popular safe zones, towns.


Some assets such as an ice and show covered cabin.


A closer look at the game’s biggest creature: Tallneck. This really helps me see what kind of mechanical parts are plating I can use for my creations. The creatures in this game all have their own weakness or weak spots. For Horizon, they use green liquid-filled cannisters on parts of the mechanical animals bodies. As an alternative, I might use areas of higher emissive levels to demonstrate areas of weakness when further modelling and texturing.

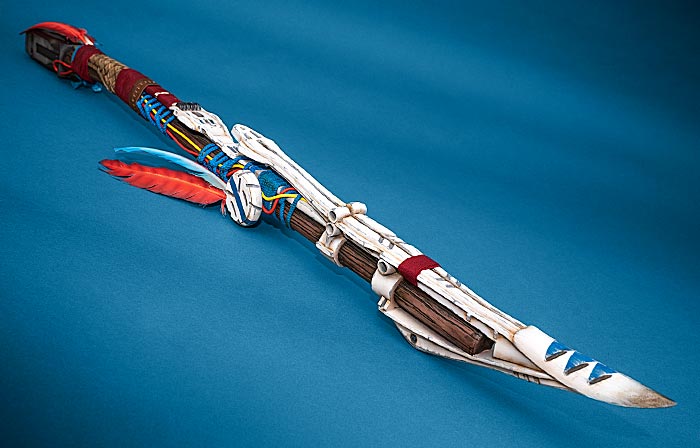
A closer look at the tribal clothes/markings people have in the game.

A good example of a tribal effigy or symbolic landmark that has somewhat significance to the people.
I have created and drawn the first creature concept, following the idea of metal-robot like animals from my game inspiration: Horizon Zero Dawn. I wanted my other source of inspiration to be dinosaurs, as they are seen less and less in video games and are easy for me to draw as I have experience with drawing them in the past. My first concept art was of an Allosaurus, the basic shape of this dinosaur was pretty easy for me to get, however the challenge rested in having to think of what metal components and substitute body parts would look best in which position. I played around with different types of metal parts such as bolts used for the movement of joints, wires to represent muscle tissue in certain areas, and a chain-like metal rod spreading through the centre of its body, almost like a metal spine reaching the end of its tail.
I then used black pen to define the details and make the design clearer to see and erased the underlying pencil lines. This helps make it easier to take into Photoshop and edit or to use as a reference image when modelling in Maya.
I plan to create at least two more concept creations, very heavily referenced by dinosaurs. Perhaps a herbivorous dinosaur and a flying dinosaur to complete a small asset scene and give a general sense of what dangers and creatures the game would provide.
Here is an image of the first confirmed concept art, after practicing and experimenting with other ideas such as vultures and modern day animals:

Here are the completed concepts with annotations and branding relative to our backstory. (EcoLife)


I then put them into Photoshop to adjust the levels and the contrast between black and white tones. However, when I scaled up the image taken from my phone in Photoshop, the original image lost it’s crisp quality.

Next I am going to start modelling these creatures in Maya. I expect this to be a big challenge for me and I am not sure if I will successfully model all of these concepts or model them as accurately as I’d like. But as a first attempt I think I can only do so well.
I used Photoshop to digitally paint and highlight a few areas of interest for each concept design. This process was tedious and inaccurate as I only had a mouse to paint with and that made it a lot more difficult.

To make this easier and get more accurate lines, I could use click + hold shift in the direction I want the lines to go. However, for more curved shapes or shapes such as wires, I had to draw smooth lines by hand.

The quality on some of these photographs could be better.

A lot of the features on these designs are the black/dark gray rubber ‘layer’ underneath, or metal plating that would be either tones of dark gray or red to suit the Japanese theme.

After a week of trying to get Maya on my home PC, my student ID was finally accepted and I was able to begin modelling. Since I have fallen behind on my modelling work I know I had a lot to do, which was pretty overwhelming.
I started this Allosaurus model by modelling a simple leg for it. However, seeing how simple the model is compared to the drawing I made, this is already discouraging. The modelled version of my concept art is going to have to be adapted into a much simpler form.
Next I began to model the body. I started by modelling the tail and extruding each time it got narrower. Next, I added the main body and the neck, onto the head and the spikes along it’s back. I used the multi-cut tool a lot in this process to created more faces on the Allosaurus’ back that I could use to create the spikes.


Next, I tried to model the arms. I created a much simpler version of the arm in comparison to the concept art I had done. However, it suits the style of the rest of the model.

After modelling all of the primary parts, I had to UV map them before I could duplicate the limbs.

UV mapping these shapes was pretty straight forward as they are simple shapes for the most part. I had to but more time into the areas of extrusion and spikes etc but it wasn’t too challenging.

After I had UV mapped one of each limb I was able to copy and paste it to save myself the time and the process.
Then I UV mapped the main body of the allosaurus, which took a quite a bit longer than the limbs for obvious reasons. The tail had a lot of extrusions to map and the spikes along it’s spine were tedious too. However, once I had finished the UV map for the body I began to add the illusion of metal plating using the multi-cut tool and depth perception to make the model look more robotic and less animated. I am planning on adding plating to the whole body and the limbs. Due to my limited ability in Maya, I am relying a lot on the texturing process to make this model actually look dangerous.

When putting all of the parts together to get an idea of what the final model would look like, I changed the scale of some parts and the body because I felt the dinosaur was too small. I made sure to select both limbs at the same time when scaling them.

Just looking at this progress image, it is clear that my drawing skills outnumber my modelling skills. I have had many more years to practice my skill with pencil and paper. The model being this inaccurate to the drawing is discouraging, however I know I cannot be too hard on myself as I am not a professional at modelling in Maya.

I added much more panelling and detail to the legs and intend to include the same details onto the arms and the body. I also added some claws using simple pyramid shapes and used the multi-cut tool to add another edge near the tip of the claws, in doing this, I could use face mode to extrude the end of the claws slightly upwards to add more dimension.
I also extended the tail by deleting my previous extrusions and adding a new face by selected the edges of the deleted face and using the bridge tool from the modelling toolkit.

As you can see I have also created some wires, hanging from the tail and the neck; referencing my concept art. I used basic cylinder shapes and the extrusion tool to create a chain-linked look along the wires. I then accessed animation mode in the top left and selected deform > non-linear > bend and experimented with the orientation of the wire until I got the correct curve. I then UV mapped the wire, which was difficult in some areas due to its curved shape. However, I intend for the wires to be purely black so I figured the UV mapping wasn’t too important.

To achieve this curve, using the tools I had used I had to reference a previous blog post.
I have finished adding faces and details to one side of the dinosaur main body;


After modelling the other face extrusions onto the rest of the body, I then modelled a few faces onto the arms which didn’t take that long and moved the limbs into position on the main body. I did mesh > combine after selected all of the objects in object mode to make my model one whole entire object.

I have multiple saves of my progress through increment and save in order to protect my work against crashes or bugs etc. I have also got separate saves for UV maps and finished results or saves where I forgot to add an ID map and had to retrace my steps etc.
Alt + Shift + D to delete history.

UV map after mesh > combine all objects into one. The UV map was overlapping too much after I saved the mesh > combine. To solve this, I went to an older save and used mesh > separate and organised the UV maps of all of the limbs into different parts of a separate UV tile. I then scaled them down and fit them into the centre UV tile.

After organising and separating UVs.
The UV mapping for the wires in the bottom right is not organised clearly as I plan to texture the wires a solid black colour.
I took my model into Substance Painter and quickly discovered that I had a hard time texturing the metal separate to the rubber underneath. So my plan was to create an ID map in Maya where I assigned a texture to both the bottom and top ‘layers’ of the model. The face selection tool was very tedious as it would often select faces far behind it when using alt + click. This made it so the ID mapping process was very long-winded.

The ID mapped model is very simple with only two colours and looks like this. I then translated the ID mapped copy into the same position as the original model.

I saved my progress and exported the model as an FBX after selecting it all in object mode. I could then see what progress I could make in Substance Painter. I haven’t used Substance Painter a lot in my free time, I only use it when doing workshops or doing lessons in college. This stood out to me a lot during this stage as I was modelling and texturing from home, and I found it a lot harder to remember how to achieve certain things or how to tackle problems without my peer’s or teacher’s guidance.
I played about with Substance Painter for a bit. Baking the mesh maps, adding metal generators to the body plating and I decided to colour the Allosaurus model red as it was relevant towards Japan. I wanted the tubing to be black and I added some gray patches randomly along the body to represent some element of wear and tear. I changed the stroke opacity of the brush I was using to make the colours blend and fade better.
I had to add a image render of my model before texturing:


Image render of my model after texturing:


For some reason, the colours practically inversed themselves after I tried to render the model after texturing. I think this may have something to do with how I baked my mesh maps but I haven’t seen Substance Painter do something like this before in my work and I am unsure of how to fix it without making further mistakes.
However, after playing around with this for a bit and trying to get it as close as I’d like it to be, I realised I couldn’t figure out how to texture the rubber underneath. In this case, I like the look of it being white as it contrasts with the red and black and it also is relevant to Japan. However it has no texture.
In this project so far, the texturing stage has been harder than the modelling and UV mapping stage. I think this is due to the fact that I have limited knowledge and practice using Substance Painter and slightly more in Maya. I was also unable to access the software I needed at home when self-isolating for a week as there were some difficulties getting it. I think if I had that week in college with the software I needed I would’ve achieved a better outcome so far with Substance Painter.
*I went back to the Allosaurus texture model after the scorpion and removed a layer that was causing the textures to glitch.*
Modelling the Scorpion
For my second asset, I am going to be modelling a scorpion from my concept art. The model is going to be a more simplistic version of my concept art as I am not as skilled in using Maya as I am drawing.
Here is the basic body shape. I used the extrusion tool a lot in this model for the curvature of the tail and to split it into segments similar to my concept art. However, in this model I have a lot more segments as it took more modelling to get the curvature of the tail that I wanted.


Next I moved onto the legs. To save myself time, I modelled one leg first and UV mapped it then copied it five more times. I rotated and positioned the legs either side and aligned them up with the body.

I have spaced them out from the body to make it easier to UV map the main body.

Next I moved onto modelling a very simplistic attempt at the scorpion’s pincers. Alike the process I used for the legs, I modelled one of the pincers then UV mapped it and copied it over onto the other side, rotating it into position and aligning it up with the body again

After all of the body parts are modelled, I began to UV map the main body;

This model has a lot of extrusion along the tail. This means that I have to remember to model the small faces underneath and around each extrusion. I liked the process of modelling the tail as I was able to get into a pattern of just extruding and scaling. The UV mapping process when modelling is usually relaxing providing that it goes well. Something I enjoy much less about UV mapping is organising and moving the UVs into position so they all fit in the same tile.

I have UV mapped the entire thing and moved the legs and pincers into place appropriately. I’m not sure what I did to make the UV maps appear as different colours but I don’t know how to change it. I went into object mode and selected everything, then exported into as an FBX into Substance Painter.
I wanted to use similar colours as I did with the Allosaurus model so included red and black on this model. This model was a lot smaller so texturing it took less time. I used the symmetry tool in Substance Painter that saved me a lot of time to paint areas of black at certain point of the body.

I also added a dirt and metal generator to the fill layers to add some detail and further texture. I experimented with the metal and roughness settings and disabled the colour option on the generators as they were overlapping my fill layer colour which was my base colour.

I used tones of gray and turned down the opacity of the brush to add areas where the red paint on the robot would be wearing off.

I added some quick eyes to the front of the model using the paint tool. I created a separate paint layer to add the eyes as I planned to try and add an emissive affect to them to enhance the robotic look. However, when I navigated to texture set settings > channels > emissive, it turned my entire model to this whilst I was on the paint layer, and I am unsure of how to fix it;


I also wanted to add some black to the end of the legs.

The render for the scorpion had less problems than the Allosaurus. I think this might be due to my layers that I used on the Allosaurus as I baked the mesh maps on either model the same.


Weaponry and Equipment
For this section of the asset pack, Kai created some ideas for medieval-esque weaponry and equipment. Here are some inspiration images he used:


Kai plans on combining these different periods of weaponry and elements of game inspiration later on as they will fill different roles in our asset pack backstory.
Here, Kai has been modelling some weapons and tools appropriate to the time and genre of our asset pack. He used a character model created by Bayley to scale the tools and weapons accurately.

He then created an original idea for transport. As people would have to traverse over great barren deserts with many dangers beneath the sand, Kai created this quick and simple land-boat;

Furthermore, Kai created armoured transport/a defence vehicle used for combat or safe salvage of old ships and scrap.

He made a submarine that was salvaged and transformed into a tank, an example of how desperate or crafty the people of this time are;

Kai moved onto texturing this model in Substance Painter, I think this looks really good.


Next, he made some basic and essential tools that people used for multipurpose reasons such as agriculture.

Kai has been in the process of UV mapping his models,

Kai has made a brief village concept in Maya:

Character Creation
For this part of the asset pack project, Bayley will be creating and developing characters.
Most of the character design concepts have been inspired by anime drifters from Kouta Hirano. This represents famous historical figures.

Bayley has been working on creating and modelling armour for different characters;


Here is some concept art from Bayley’s blog;


Conclusion
For this project, we worked as a team to create different parts of our chosen asset pack theme. I think we communicated well and even dedicated ourselves to a separate discord server to help us organise our work and ideas. For this project, my favourite stage was the early stage concept art – I enjoyed the idea generation process I went through and I find it fascinating how my ideas for this asset pack changed in varied ways. My second favourite part was the modelling, despite it being a little stressful at times, the process was refreshing and educational. I struggled with the texturing process, as I was having problems getting the emissive channel to work in the right areas, which meant I didn’t have enough time to add any glowing LED effects to the models.
